Nuffnang Ads

Wednesday 16 November 2016

Chiling Waterfall

As weekend approaches it's time for hiking again!
This round, we went to Chiling Waterfall!

This place is famous for its river crossing and of course, according to its name, and literally meant it, the very chilling waterfall at the end of the trek!

To reach this place, simply Google or Waze it, it can be found easily!
However, you will need to search by the name Santuari Ikan Sungai Chiling.
This is the place where you park your car and where the trek starts!

The trail from carpark to main entrance of Chiling Waterfall is very easy!
It's just like a chill walk for around 10 minutes and you will reach the reception.

*the trail from carpark to entrance, it's all flat ground*

*the main entrance of Chiling Waterfall. Campers are all camped at this space*

 *the reception*

*registering*

RM1 per pax is to be paid as entrance fee.
If you're going in a big group, you can get a name list ready, consisting name, IC number, emergency contact and home address for each participant. This will save you a lot of time at the reception. 

Also, refundable deposit will be charged on the food & beverages with disposable packaging.
We brought 18 packaged water (Justea) and 13 bread, and we were charged RM50 for that. 
Note that if you bring the rubbish out together, you will get back your deposit.
They did this to ensure that all visitors do not simply throw rubbish in the woods.

*the emergency contact in case anything happens*

*the bridge a.k.a. the 1st river crossing!*

From the reception till the main waterfall, there will be total of 6 river crossings!
After crossing the first bridge aka the first river, you will need to do the trekking for around 15 to 20 minutes or so before reaching the second river crossing point.
Normally there will be crowds on weekends so fear not! You won't get lost in the woods!

Now, let the pictures do the talking!

*the 1st crossing - you can choose to cross the river or just use the bridge*


 *the river crossing points are all marked with the signboard*

*second crossing*

 *queuing for third crossing*


 *third crossing*

*third crossing*

*moving on the fourth crossing!*

*resting while waiting for other participants of the group at 5th crossing point*

*last crossing before the main waterfall!*

*ta-da!! the majestic waterfall!*

 *the crowd during weekend*

*cliff jumping - Derrick* 

*cliff jumping - Jo* 

*last but not least, the group photo!*

After 1 hour or so, we started to pack and head back to the carpark.

We got lucky as we went out before it started to rain.
We heard from the news that people are trapped in the woods and cannot get out until night time as it rained and the water current got so strong that they are unable to come out.
We hope no one is injured during the incident.

Summary of the hike:-
1. Around 1 hour of trekking from carpark until the main waterfall.
2. It's for sure that you're gonna get wet, so bring along a full set of clean and dry clothes for changing!
3. Entrance fee RM1 per pax; free parking; refundable deposit will be charged for all foods & beverages with disposable packaging and will be refunded if all rubbish are brought out together afterwards.
4. River crossing might be dangerous during raining season, so be sure to check weather forecast before going.
5. Family friendly activity, but must take care of the elders or kids during river crossing as some parts are quite slippery.
6. Best shoes for this activity - KAMPUNG ADIDAS!!

That's all for today and please stay tuned for our next post!
Until then, ciao!!

Tuesday 18 October 2016

Broga Sunset Hike!

Broga Hill, a place well-known by almost everyone for its nice sunrise view.

For those who are not familiar with Broga Hill, it is located at Semenyih.
Many has sacrificed their sleeping time and came here as early as 5am, just to get a chance to peek at the sunrise from its peak!
Of course, we had done that too.

This time around, we did something different.
We went for BROGA SUNSET HIKE!!

During the evening it's not as packed as in the morning.
There was only a few cars at the parking space.
RM3 was collected per car as parking and entrance fee.

Hiking up took around 45 minutes to 1 hour, depends on your stamina.

By 6.30pm or so, we've reached the peak of Broga Hill.
There are 3 peaks, we stopped at the second one for the best sunset view.

Now, enjoy the sunset photos and time lapse!!


As the watch hit 7.10pm, we started to descent as it's getting dark.

In a nutshell, it is a totally different experience ascending in broad daylight, and descending in the dark at Broga Hill.
Familiar place, but a whole new experience.

Everyone enjoyed the hike and made new friends!!

Summary of the hike:-
1. Sunset time at Broga Hill started around 6.55pm, so if you want to view the best sunset, be sure to reach the peak by around 6.40pm
2. Bring torch light!! Whether you're going to Broga Hill for sunrise or sunset, torch light is a MUST as you won't want to hike in total darkness
3. Sufficient water and snacks
4. RM3 per car for parking fee and entrance

Until the next hike, ciao!!!

Friday 14 October 2016

Bukit Batu Putih, Tanjung Tuan

This round, we will introduce a very leisure place for hiking!

Located at the border of Port Dickson and Malacca, Hutan Rekreasi Tanjung Tuan is a very leisure place for hike. It's very suitable for beginners and families.

To reach this place, just Google or Waze Hutan Rekreasi Tanjung Tuan.
It is the same entrance with Cape Rachado, the lighthouse.

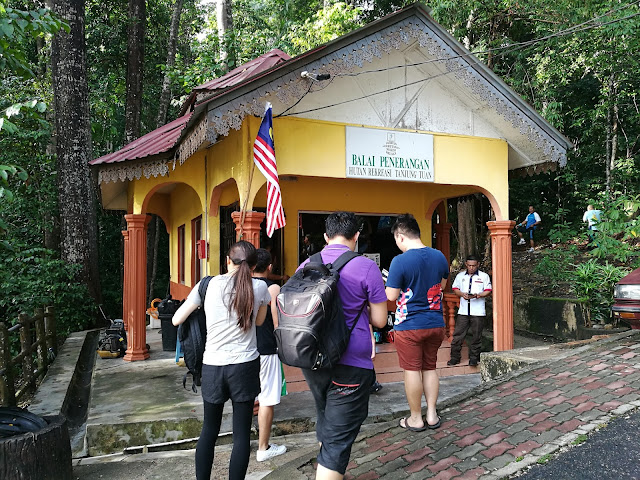
Entrance fee RM1 per pax is payable to the management.
As for the parking, the space is very limited, hence you might need to reach this place as early as you can.


We started out with tar road from the entrance fee collection booth. 
It is quite short and it’s relatively easy.


However, you will need to be extra careful as there’s wildlife SCORPION!!
Yes you see it right, a scorpion. 


I stepped on one and luckily I did not get injured and it did not die from my leg.

We stayed on the tar road for around 10 to 15 minutes.

To reach the peak, there are 2 available routes.
The first route is on your right, heading downwards.
From the condition and steepness of the route, it is suggested to wear proper hiking shoes or
at least a proper pair of shoes. No slippers!!

The second route is also on your right, but it slightly going upwards. Also, it is very near to the lighthouse.
In fact, the lighthouse is right in front of the fork to the route.
We took the second route up as our group has one participant wearing slippers. Better safe than sorry.


*the entrance of second trail which leads to the peak*

The trail is also relatively easy, a little bit up and a little bit of down.
No worries of being lost at all as the trail can be clearly seen.
Follow the trail for 10 minutes or so, you will reach the final part of hike before reaching the peak.


It is a wall of big rocks, hence a little bit of rock climbing is required.
But again, no worries! It is a very easy climb!
However, do take note and be patient, especially during weekends and holidays.
There will be a lot people queuing for going up or going down, so DO NOT RUSH!!
Think of your own and other people’s safety as well.

Finally, we are at the peak!!
Breathtaking view, and you can definitely get your instagram-worth or profile picture-worth of photos.
As the space up here is limited, so be very careful when you are taking photos.
Remember, be patient and take turn!!

Next, are all the nice photos taken at the peak. Enjoy!!


Summary of the hike:-
1. Very easy hike
2. Limited parking; parking at roadside
3. The entrance of Hutan Rekreasi Tanjung Tuan is right next to PNB Ilham Resort
4. Entrance fee of RM1 per pax
5. Hot weather, be sure to bring sufficient water/isotonic drink to keep yourself hydrated
6. Wear cap to protect yourself from the heat

That’s all for this round. Hope you all find this guide helpful, and enjoy hiking!!