Nuffnang Ads

Wednesday, 8 March 2017

Gunung Datuk Daypack

After getting off from hiking activity for almost a month (CNY break - kononnya),
We finally decided to get back to the nature!

This time, we visited Gunung Datuk!

Located at Rembau, Seremban, Gunung Datuk is famous for its rocky peak and sunrise view!

To get here, simply Google or Waze 'Gunung Datuk' and you will be led directly to the entrance!
Also, once you exit toll (Pedas/Linggi), you will see signboard leading you to Gunung Datuk along the way.
It is around 1 hour and 10 minutes drive from KL. Pretty near I will say =)


One advise for those who keen to hike here, do CARPOOL if you are going in groups.
The parking space is very limited near the entrance.
You might need to park further a bit and walk to the entrance if needed.

Be reminded, DO NOT BLOCK THE WAY!
You might block the way of ambulance or fire truck in case of any emergency.

 *where we parked our car - along the roadside*

 *us walking towards the proper carpark a.k.a. entrance of the trail*

 *the carpark*

 *the entrance with sun-rays through the trees!*

*another view of the entrance - it suggested that the trail to peak is around 2km. In fact, according to my team's tracking, it's around 4km per way*

The trail starts with descending a well maintained flight of stairs as seen in the photos.
Enjoy your time here, as it will be the last nice scene before the start of the nightmare (ok lah it's not that scary but the trail after this is not easy either).


 *the view which welcomes you after that flight of stairs*

 *small bridge*

*the view from other side at the start of the trail* 

*the start of ascending? No, not quite yet*

After crossing the small bridge and hike up a bit, you will get to a cottage, where they collect the entrance fee/permit here.
You will need to register yourself here. 
For big group, it is recommended to get ready a name list of participants containing names, IC and contact number, and just pass the list to the ranger to save your time.
Permit is RM5 per pax.


 *the emergency contacts*

*the map of the trail*

After this cottage, is the start of the challenging part!
I've read most hiking blogs mentioning that the challenging uphill part is only like for one hour, and the rest is more of flat ground.
But NOOOOOOOO.
It turns out that the trail is ALL THE WAYYYYYYYYYYYYY UP until the very peak.

Yeap, it is that challenging.
For those who aren't too fit, please take your time and just follow your own pace.
Do not rush things. The peak is always there.


*a super huge tree where you can see on the way*

 *uphill*

 *still uphill*

 *more uphill*

 *forever uphill*

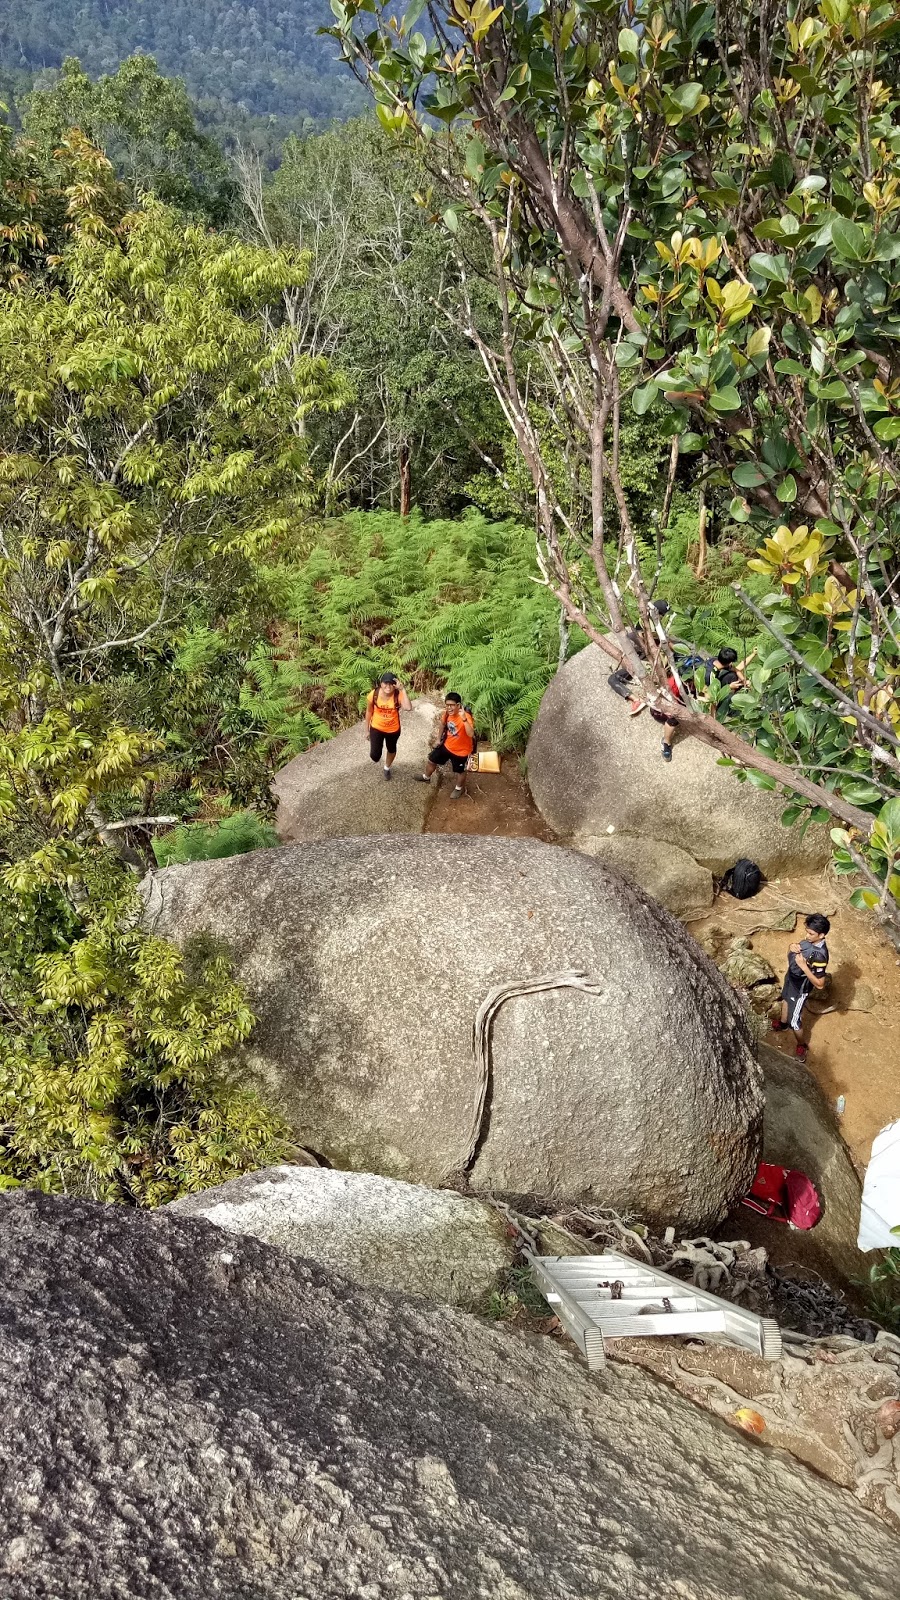
Though the trail is challenging, but it is very clear.
Direction of trail is marked with red paint along the way (on the rocks and trees as you can see from the photos).
There is no need to fear for lost in the woods as there are many other hikers along the way as well.
Just need to be careful and take one step at a time.
Do not lose your balance or you will fall straight down!

After around one hour hike, we have reached the rest point.
This is the only proper rest point for this trail.

We took a 10 - 15 minutes break here before continue ascending to the peak.


*the starting trail from rest point is still uphill*

From this point onward, we did not take much photo of the route.
We are tired, and the trail is all uphills.
Well there are 2 short distance where the trail is of flat ground, but it is superrrrrr short.
So do not expect you will get much rest there.

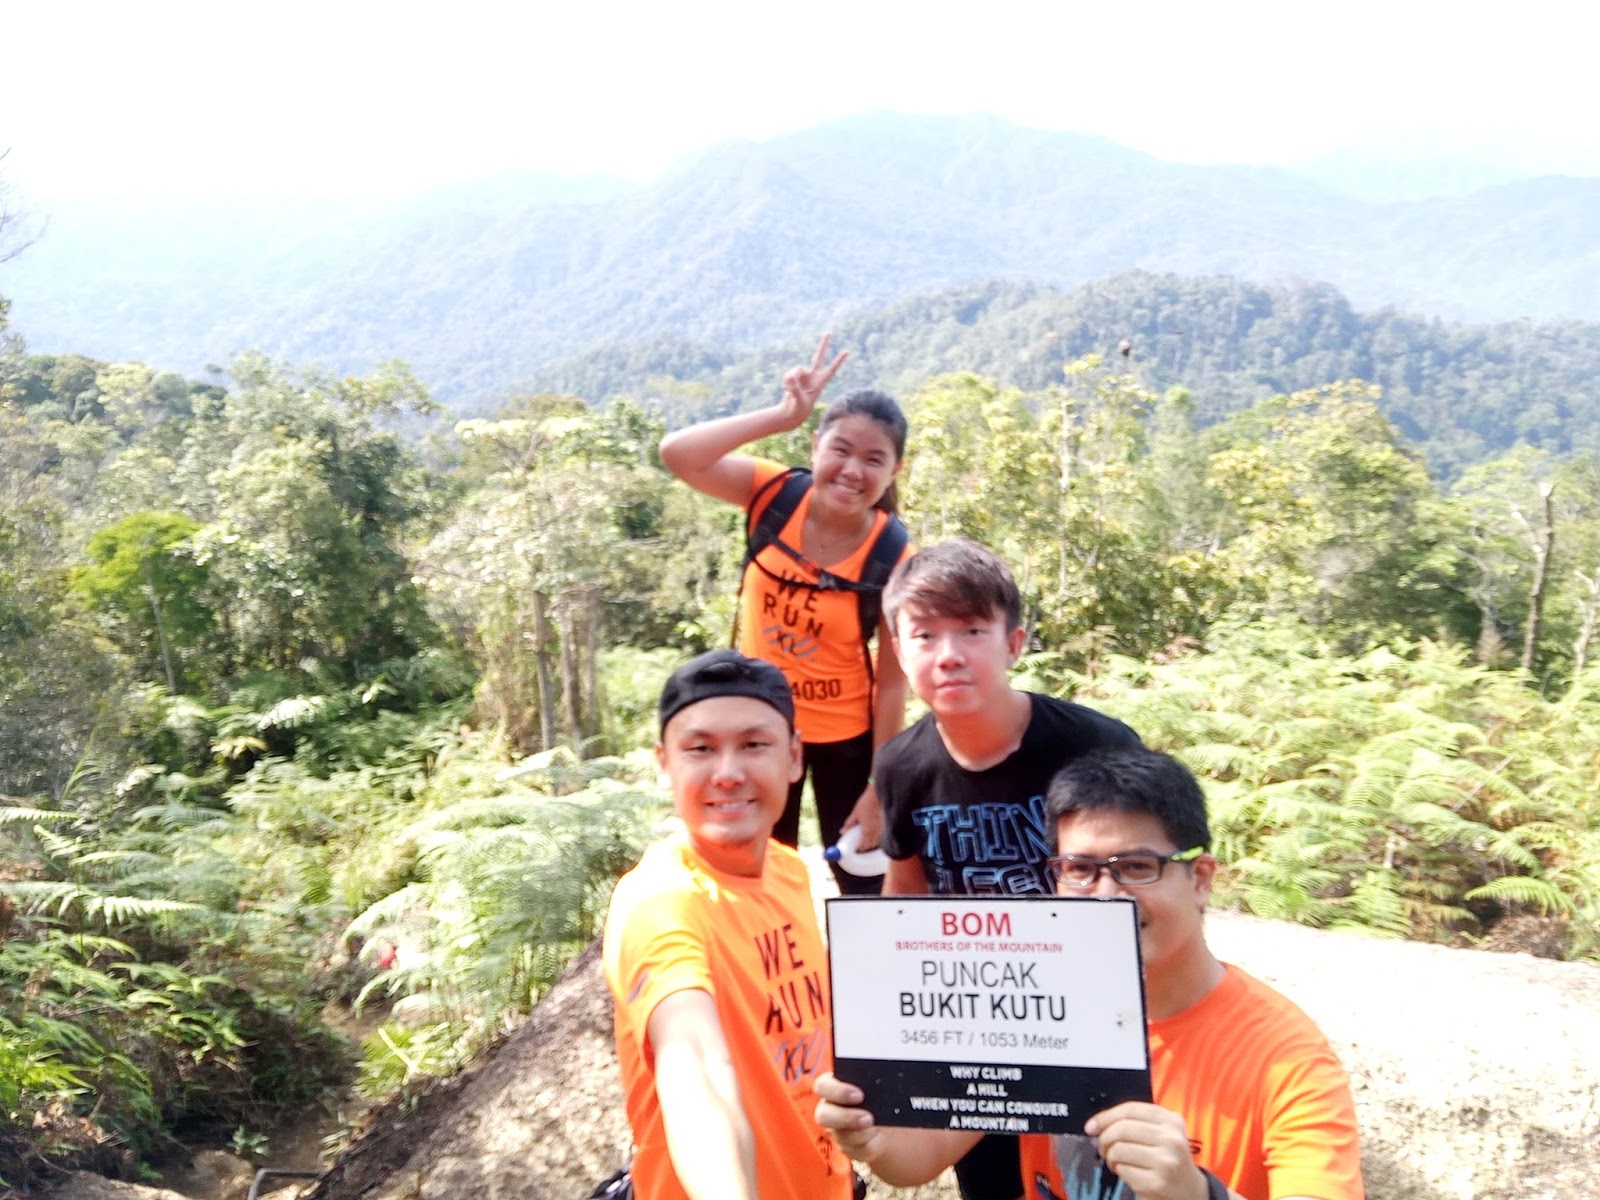
After around 3 hours of hiking uphill, we are finally at the peak of Gunung Datuk!!
Despite of the hot sun above us, the peak is super windy! 
All the tiredness and sore gone away just like that once we reached the peak.
However, there is no view at this place.

*the must-have group photo with the signboard of the peak*

The adventure does not stop here.
You can still go up further for stunning view!
But first, you will need to climb few flights of stairs installed by previous hikers.

*Long and tall stairs*

*the view of the same stair from above - quite high isn't it?*

After climbing those stairs, you will reach the middle and this view welcomes you.
Stunning?


To get to the highest peak, you will need to climb up these stairs.

*the last two flights of stairs before reaching the highest peak*

And TA-DA!!!
The breathtaking view awaits you!!


We stayed at the highest peak for around an hour, just for taking photos.
After we are satisfied with all photos and as the peak become hotter and hotter, we decided to descend to the initial peak to get some rest and recharge ourselves.

Another reminder here, take turn and be patient when using the stairs.
Everyone wants to get to the highest peak, and everyone wants to go back down.

After we rested for around half an hour, we started to descend.
While we thought descending will be much more easier than hiking up, we are WRONG.

As the hill is very steep, descending becomes harder as it requires more knee and muscle strength.
We took around 1 hour 30 minutes to descend, but our knee and leg muscle are sore and tired. Our legs feel squishy at the end of the trail.
So our advice, wear knee support if required, and bring hiking poles with you to reduce the stress on knee.

Summary of the hike:-
1. Moderate to difficult hike. Not recommended for beginners, unless you have strong physical and stamina
2. Limited parking, recommend to carpool (carpark normally full at around 7am)
3. Hiking permit at RM5 per pax
4. Bring minimum 2 litre of water per pax
5. Knee support and hiking pole is strongly recommended for those who have weak knees
6. Around 3 hours (slow pace) hike up; 1 hour 30 minutes hike down
7. Be patient and take turn to climb stairs to avoid accident

That's all for today's update.
Till the next hike, ciao!!

Monday, 20 February 2017

ANNOUNCEMENT

Hello everyone!

Thanks for stopping by! If you are from our old blog (http://ouchhiking.blogspot.my/) , you already know that we relocated from the old domain to this new blog!

We will continue to share more hiking knowledge and experiences in this blog.

Thanks for the support and till the next post, ciao!! =D

Love from,
OUCH Hiking Admin

Friday, 27 January 2017

Bukit Kutu Day Pack

Again, we visited Kuala Kubu Bharu for the ??? times.

Kuala Kubu Bharu is really a heaven for hikers as that location alone has many peaks!!
Another two attractions here are Chiling Waterfall and LataMakau.

This time, we went to Bukit Kutu.
To reach this place, simply Google or Waze to the location below.


If you are wondering whether it's the same entrance with Lata Makau, yes you are correct!
You have to go to the same parking spot and entrance to go to Bukit Kutu.

To reach Bukit Kutu, you will have to keep right after crossing the bridge.

*yeap, this bridge*

The beginning part of the trail is rather flat, and starts to get steeper when you went deeper into the woods
It took us around 3 hours to reach the peak with slow and steady speed.

While we are trekking up, we met a very friendly guider dog!
We named him Milo, I don't know why.


He is very familiar of this hill.
He will follow us at the back; when we move, he moves, when we stop, he stops too.

And guess what, he's very smart too!
Sometimes when we continued walking and lost sight of him, we turned back and look for him, and he's there, guiding the next group of hikers who are behind us.
Milo would follow the last group of hikers he met and follow.
He's a cool dog sweeper! =D

We tried to feed Milo some plain bread and water.
He dare not to straight away eat it or drink it from our hands, so we find a big piece of leaf and put the food and drink on it to feed it.

*the big rock*

This is one magnificent view.
Halfway through the trail to the peak, you will see this very big magnificent looking rock boulder.
Getting up here require a little bit of hand strength and good balancing.
There was one rope provided for hikers as support but remember, do not fully rely on the rope as you will never know how long it has been there and whether it is still safe to be used!

Reaching here means you're half way to the peak.
Also, this is also the place where it starts to have bunch of bees surrounding you.

According to other hikers at the hill, there are a lot of bees there and they will follow the hikers due to the body odour.
So, remember to bring insect repellent and USE IT!!


After 3 hours of trekking, finally we are at the peak!
Of course, Milo and the bees escorted we all the way up!


To reach the very peak, you will need to climb the stairs which were set up there permanently by previous hikers.
Do take note that if you're afraid of height or not confident, DO NOT attempt!
It can be very dangerous there if you take the wrong step.


*this is how high the rocky peak is from the bottom*

After rest for around 1 hour at the peak, we started to descend and got back to our car around 2pm.

Summary of the hike:-
1. Moderate hike, beginners who wants to attempt this hill are advised to get someone to guide them
2. Parking fee is charged by the Orang Asli (it should be around RM1 - RM3 but I've forgotten the exact price)
3. Hiking permit is required (RM5 per pax). Contact is provided below.
4. 3 hours leisure trekking to reach the peak
5. Must bring sufficient water and snacks for this hike as it might get hot in the woods especially during the noon
6. Must use insect repellent or else you will be stung by bee
7. Bring food and drink for Milo (the guider and sweeper dog) if you can. He is a very friendly dog so don't be afraid of it! =D

Contact of Hulu Selangor Foresty Department as follow.
Kindly contact them for details on applying permit for Bukit Kutu.


 Till the next hike, ciao!!

Sunday, 1 January 2017

5 Easy Trails for Beginners!

Happy New Year 2017!!!

On the first day of year 2017, we are gonna introduce some easy trails for beginners or anyone who wants to start exploring the Mother of Nature!

1. Broga Hill (Difficulty - 4 out of 10)


Well, I believe everyone knows this hill very well!
Famous for the sunrise view, Broga Hill is located at Semenyih.


It takes around 40 minutes drive from KL.
To get the best sunrise view, it's better to reach the peak by 6am.
If you reach the peak after that, the better viewpoints will be occupied by other hikers/visitors as it can be very crowded especially on weekends.

The trail to the peak is rather easy. One can reach the peak quite easily in 1 hour with normal pace.

Fees applicable:-
RM3 per car entry for parking
RM1 per pax for entry to Broga Hill trail (starting from Dec 2016)

More details here and here.


2. Chiling Waterfall (Difficulty - 4 out of 10)

Looking at its name, this place is well known for its very chilling waterfall at the end of the trail!
Also, for anyone who prefer a little bit of adventure, this trail offers river crossings as well, and there are total of 6 river crossings!!


It's located at Kuala Kubu Bharu.
To reach here, it takes around 1 hour drive from KL.

This place is well managed by the management and they provide camping sites as well as washrooms and bathrooms for those who need to take a shower after the water fun!

Do note that it might be very slippery during river crossings, hence rubber shoes (a.k.a. kampung adidas) is recommended if you're visiting Chiling Waterfall.

Also, it is not recommended to visit this place during rainy season as the water current will become strong and it could be dangerous.

Fees applicable:-
RM1 per pax for entry
Deposit is applicable for every food/beverage in bottled packaging - refundable if you bring out all the rubbish after consuming the food and bevarage (amount of deposit subject to management decision)

More details here.


3. Pisang Waterfall (Difficulty - 2 out of 10)

Located at Gombak, this place offers a big pool of waterfall at the end of its trail.

To reach here, you will need to Waze yourself to Kem Alang Sedayu, or simply view the map below for your reference.


The trail is very easy and requires minimal physical strength.

What is attractive here?
It's the tunnel that you'll have to pass through on your way to the waterfall!

Fees applicable:-
RM1 per pax for entry (as at Jan 2016)

More details here.


4. Setia Alam Community Trail A (Difficulty - 3 out of 10)

This place is actually a community trail located at Setia Alam.


There are few trails which leads to the peak.
For beginners, it is advised to start with Trail A (refer to image below for the starting point).

It takes around 30 - 45 minutes to reach the peak.

If you're aiming for sunrise view, it is recommended to start trekking at around 5.30am.
You're guaranteed for a very nice night view of the city and rewarded with beautiful sunrise!!

Fees applicable:-
None


5. Bukit Batu Putih, Tanjung Tuan (Difficulty - 2 out of 10 for trekking trail; 6 out of 10 for rock climbing trail)

Another easy trail for beginners would be Bukit Batu Putih which is located at Tanjung Tuan (Port Dickson).


For trekking trail, it is suitable for family or those who prefer hiking with a more leisure pace.
However, at the end of this trail you're required to do a little bit of rock climbing, but it is quite safe as long as you don't rush.
It takes around 15 to 20 minutes to reach the peak via this trail.

As for rock climbing trail, it is more suitable for those who are looking for a more adventurous hike.
Do note that it can be dangerous for those who are afraid of height or without good physical strength.

Fees applicable:-
RM1 per pax for entry

More details for trekking trail here.
Video for rock climbing trail click here.


Okay!
That's all for today's post.

Hopefully the info provided is helpful for you guys who are reading!

Until the next hike, ciaoz!!!